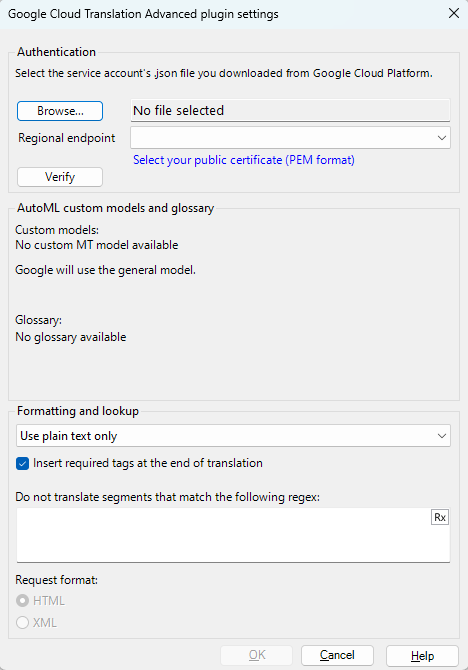
Google Cloud Translation Advanced plugin settings
Google Machine Translation Advanced (or Google Translate API v3) can do everything the Basic API can, but also allows usage of glossaries and custom MT models that can be quickly trained with the AutoML (Automated Machine Learning) feature.
The Google Cloud plugin will now use neural machine translation if it is available in your language combination. In some cases, neural machine translation can be much more fluent and human-like than statistical machine translation. Want to learn more? See which language pairs are available for neural machine translation.
How to get here
- At the top of the memoQ window, click the Resource console
 icon. The Resource console window opens.
 - In the Server URL list, choose or type the server's address. Or, to see local resources only, choose My computer. Click the Select
 button.
 - In the left-side pane, click the MT settings
 icon. The MT settings pane appears.
 - For projects with more than one target language: In the top-right corner, choose a language from the Target language dropdown list if needed. Or, to use the same MT settings for all target languages, do not change the default value (All languages).
- Select the MT settings resource you are using, and click Edit under the list.
- On the Services tab, find the plugin and click its row. If it is active, click its row to open the Google Cloud Translation Advanced plugin settings window. If it is grayed out, click its row once to turn it on, then click it again to open the settings.
What can you do?
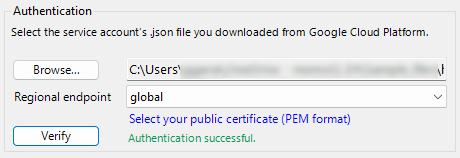
To authenticate using a JSON file:
-
Get your authentication file. To learn how, see Google's Cloud Translation guide. At the end, you will have a .json file of a valid service account.
-
Under Authentication, click the Browse button, and find the .json file that you received.
-
memoQ signs in with the information in the .json file. If you see an Authentication successful message, you are ready. If the file is invalid, you will receive an error message.
-
Get your certificate file. To learn how, see Google Workspace's Admin Help. At the end, you will have a .cer file of your company's network domain.
-
Under Authentication, click the Select your public certificate (PEM format) link.
-
In the Advanced authentication window, click the Browse button, and find the .cer file that you created.
-
Click the OK button.
-
memoQ signs in with the information in the .json file. If you see an Authentication successful message, you are ready. If the file is invalid, you will receive an error message.
-
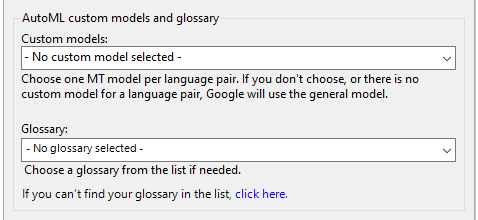
From the Custom models dropdown, choose a MT model for each language pair. If you don't choose, Google will use the general model.
-
Under Glossary, select a glossary from the dropdown if needed.
-
If you can't find your glossary in the dropdown, click the create one link.
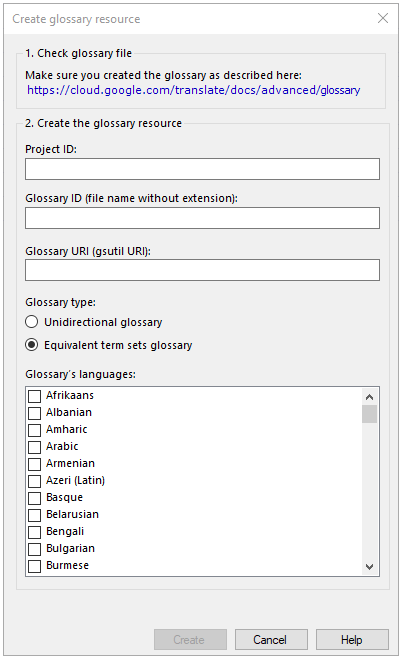
The Create glossary resource window opens:
Here you can:
-
Check if your glossary was created properly: Click the link under Check glossary file section. It will redirect you to relevant page on Google Cloud's documentation.
-
Create the glossary resource: Fill in all the data (Project ID, Glossary ID, and Glossary URI) necessary for creating the glossary resource. You can copy those data from the Google Cloud interface.
-
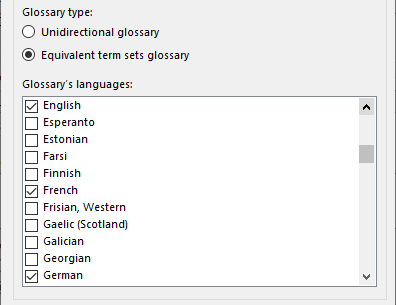
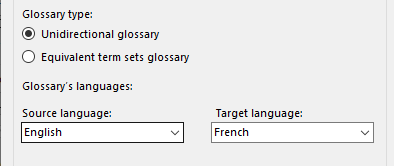
Choose glossary type: You can choose between two glossary types Equivalent term sets glossary (default) and Unidirectional glossary.
-
When you are done: Click Create to create your glossary.
If your glossary is ready, memoQ redirects you to Google Cloud Advanced plugin settings window and displays a confirmation message under the Glossary dropdown. Your glossary resource appears in the glossary list.
If your glossary could not be created, memoQ displays this information above the Create button in the Create glossary resource window.
To delete a glossary: Click the Delete
 icon in the glossary's row. The Delete glossary window opens. To confirm delete: Click the Delete button. To keep the glossary: Click the Cancel button.
 -
Normally, when memoQ sends text to Google, the tags are not sent. The translation you get back from Google will not contain any tags. memoQ will insert all the tags at the end of the machine-translated text. Choose how to handle tags with the Formatting and lookup dropdown:
- To use no formatting and no tags: Choose Use plain text only.
- To use formatting but use no tags: Choose Use text and formatting.
- To use both formatting and tags: Choose Use both formattings and tags.
To leave the tags out altogether, clear the Insert required tags at the end of the translation check box.
Do not send sensitive text to Google: Type a regular expression in the Do not translate segments that match the following regex box. If you need assistance, open the Regex Assistant: Click the ![]() icon on the right, and create a regex, or choose one from the regex library. Then click the Insert regex button. memoQ inserts your regex into the text boxes as needed. If a segment has text that matches the regular expression, memoQ will not send that segment to the Google MT service. For example, if you do not want to send segments that contain dollar amounts, write USD [0-9]+ or \$ [0-9]+ in this text box.
icon on the right, and create a regex, or choose one from the regex library. Then click the Insert regex button. memoQ inserts your regex into the text boxes as needed. If a segment has text that matches the regular expression, memoQ will not send that segment to the Google MT service. For example, if you do not want to send segments that contain dollar amounts, write USD [0-9]+ or \$ [0-9]+ in this text box.
If you send tags to Google, choose the format: XML or HTML. MT services sometimes have problems with tags. Try both options, and see which one works better for your language pairs.
Different settings work better for some language pairs? On the Resource Console, clone your MT settings, and in the cloned one, choose the other option from the Request format dropdown. You now have two MT settings resources, and can use the best one for each project.
When you finish
To save the settings and return to the Default resources tab of the Options window (or to the Resource console): Click OK, then click OK again.
To return to the Default resources tab of the Options window (or to the Resource console), without saving the new settings: Click Cancel, then click Cancel again.
To use the MT output in the translation editor:
- Open a project with a supported language pair.
- On the left side of the Project home or memoQ online project screen, click Settings.
- In the top bar, click the MT settings icon.
- Choose the MT profile in the project, or one you want to add to the project. Below the list, click Edit.
- On the Services tab of the Edit machine translation settings window, check the plugin's check box on the left.
- On the Settings tab of the Edit machine translation settings window, in the Translation results area, choose a setting other than Off.
- Open a document for editing, and see the machine-translated suggestions.
To use the MT output in pre-translation:
- Open a project with a supported language pair.
- On the left side of the Project home or memoQ online project screen, click Settings.
- In the top bar, click the MT settings icon.
- Choose the MT settings resource in the project, or one you want to add to the project. Below the list, click Edit.
- On the Services tab of the Edit machine translation settings window, check the plugin's check box on the left.
- On the Settings tab of the Edit machine translation settings window, select the plugin from the Pre-translation dropdown.
- Run Pre-translate. In the Pre-translate and statistics window, check the Use machine translation if there is no TM match check box. (memoQ will remember this.)