Configure server
After memoQ server is installed, use the Configure server window to change most of its settings. You can check or change the following:
- The folders where memoQ server saves exported and archive files
- The network addresses where memoQ server can be reached
- Network connection settings - use this to set up secure connections to memoQ server
- E-mail server and settings that memoQ server uses to send notifications
- Web service API settings - whether it works or not; addresses, security, and filtering
- Resources API settings - whether it works or not; addresses, security, and filtering
- CMS Connector - whether it works or not; addresses and security
- Content connector settings - whether or not memoQ server can receive push notifications from the Content connector
- Server to server - the certificates this memoQ server can use in server-to-server workflows.
How to get here
When you do this, memoQ server will already be installed on the server computer.
- Log in to the memoQ server computer through Remote Desktop.
- Open the Start screen or the Start menu: Press the Windows key.
- Type memoQ, and wait for the results to appear.
- In the list, click memoQ Server Deployment Administration.
- Windows may ask you to confirm to run the program. Click Yes or Run.
- The Deployment window opens. You need the topmost section (memoQ server):
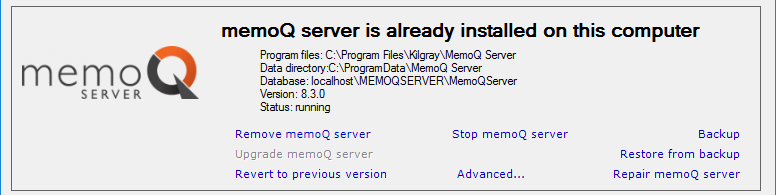
- Click Advanced:
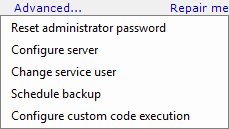
- From the menu, choose Configure server. The Configure server window opens:
What can you do?
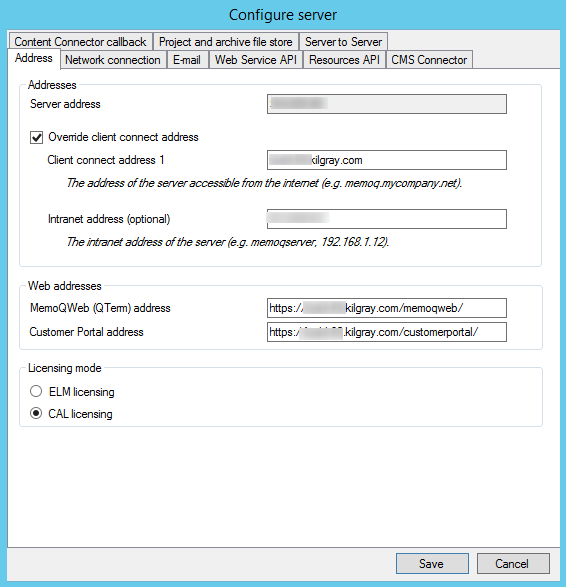
To set this up, click the Address tab.
memoQ server takes the address for the server from the computer name in Windows settings.
If you set up another address for memoQ server - for example, you set up an internet address like memoq.company.com -, you need to fill in the Client connect address 1 box. If the server is outside the network of your organization, this is all you need.
If the server is inside the network of your organization, it may have a different external address and an internal address. In this case, you may need to fill in the Intranet address (optional) box, too.
- Server address: This box contains the IP address or the name of the server. You cannot write in here, this is always taken from Windows settings.
- Override client connect address: Check this check box if you need to use a different address. Be careful: If you enter the wrong address, the server may become unreachable for remote users.
- Client connect address 1: Type or paste the internet address of the server. From the internet - for external users -, memoQ server will be available through this address.
- Intranet address (optional): If the server computer is inside a corporate network - and not in a public hosting center or a cloud provider -, you may need to use a different address for internal access. Type or paste this address here.
- memoQweb (QTerm) address: If memoQweb is also installed on this computer, type the web address (the external address) of memoQweb. If someone uses memoQ to connect to this server, and they want to open a document in memoQweb, their copy of memoQ will use this address. If this address is not there, users may not be able to open documents in memoQweb, at least not directly from memoQ.
You must fill in the address fields if you need the server to distribute CAL or ELM licenses. To learn more: See Help about the CAL licenses or the ELM licenses pane of Server Administrator.
To choose the licensing mode, click the Address tab in the Configure server window.
Do not use the Server Administrator: Always change the licensing mode in the Deployment tool. You do not need to install memoQ on the memoQ server computer.
memoQ server can lend licenses to translators, reviewers, and project managers. To do this, the server must have a license pool, a finite set of licenses, from which it can give licenses - and take them back when necessary.
There are two ways to lend licenses to users: CAL and ELM.
- ELM (Enterprise License Management): A user takes a license when they check out an online project that gives them a license, or when they use memoQ activation to request one. The license does not return to the license pool when the user closes memoQ. An ELM license is truly lent to the user for several days. memoQ will check the validity of a license once a day, but if there is no response, it can go on working for three days. For the owner of a memoQ server, ELM is less economic than CAL, but it allows users to work offline for several days.
- CAL (Client-access Licensing): A user takes a license when they start memoQ. The license is automatically returned to the license pool when the user closes memoQ. It is possible that two users take the same license during a day, if they work in very different time zones. To use CAL licensing, users must be online at all times. For the owner of a memoQ server, CAL licensing is more economic than ELM, but CAL does not allow users to work offline. To start using a CAL license, a user needs to check out an online project that gives them a license, or they need to use memoQ activation to request one.
One memoQ server is either all CAL or all ELM: You cannot mix CAL and ELM licenses on one memoQ server. Either all licenses lent are ELM, or all of them are CAL. You can switch between both licensing modes. To do it, log on to the memoQ server through Remote Desktop, and change this in a copy of memoQ running on the server itself.
Normally, a new memoQ server will run in the CAL licensing mode.
To change the licensing mode to ELM: Click the ELM licensing radio button, then click Save. Then stop the memoQ server and start it again.
To set this up, click the Network connection tab.
If you need to set up a secure connection: First, go to the Resources API tab, acquire and install a certificate, and then come back to the Network connection tab. You can choose a certificate thumbprint from installed certificates only.
Don't make changes unless you have experience operating computer networks, and everything written here is clear to you.
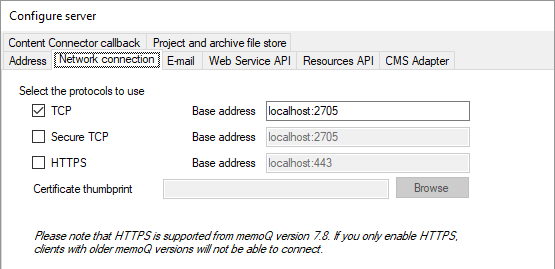
Normally, memoQ server allows memoQ to connect over the port 2705 of the TCP protocol, without encryption. Most of the time, you do not need to change this.
If you still need to use another port: Next to the TCP check box, in the Base address box, change the port number after 'localhost'. Make sure the port is available: Open the Windows command line. Type netstat and press Enter. Windows will list all ports where existing applications are listening.
It is not recommended to use Secure TCP. To set up a secure connection, use HTTPS.
To set up a secure connection:
- Go to the Resources API tab, and set up the certificate you plan to use with secure connections.
- Come back to the Network connection tab. Check the HTTPS check box. Next to the Certificate thumbprint box, click Browse. A Windows Security window opens:
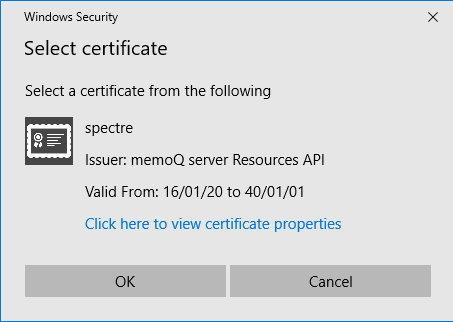
- This window lists the certificates you can use with memoQ server. (The screenshot shows one certificate, and you do not need to select.) Click the certificate you need, and click OK.
- The Network connection tab returns, and the Certificate thumbprint box will be filled in. You may need to stop and restart memoQ server.
To allow secure connections only: After you set up the HTTPS connection, clear the TCP check box.
Users will need memoQ 2015 R2 or higher: Earlier versions of memoQ do not support HTTPS connections.
memoQ server needs to send e-mails for several reasons. To check or configure how your system will send e-mails, click the E-mail tab. If you did not set this up before, you will need to specify the e-mail server you are planning to use, and the e-mail address from which memoQ server will send e-mails.
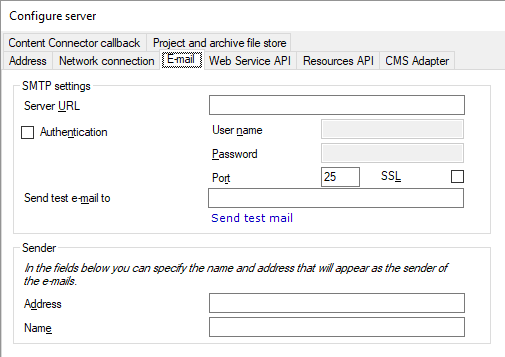
- In the Server URL box, type the Internet address of your organization's e-mail server. If you are not sure, contact your IT staff.
Modern e-mail systems all require authentication - e-mails must always be sent from a mailbox that can be traced back to the organization. memoQ server will need a user name and a password to send e-mails.
- Check the Authentication check box. In the User name box, type the user name that memoQ server will use. In the Password box, type the password that belongs to that user name.
- Modern e-mail systems all use encryption as well. If your IT staff does not give you different information, check the SSL check box, and type 465 in the Port box. That is the most common configuration.
There is one exception when encryption is not required: If the memoQ server is in the same secure area of the network as the e-mail server - behind the same firewall -, authentication and encryption may be unnecessary. If you are not sure, contact your IT staff.
- Recipients need to know who is sending the e-mail (so that memoQ server does not send e-mails directly to the translators' Junk folders). Under Sender, fill in the Address and Name boxes. Address is the e-mail address of the memoQ server. Normally, it's a no-reply address because memoQ server does not read e-mails. The Name box has the full name for the memoQ server. Use a name that tells the user the e-mail is from a memoQ server.
- When everything else is filled in, type your own e-mail address in the Send test e-mail to box, and click Send test e-mail. Watch your e-mail program. If the test e-mail does not arrive in reasonable time, check the settings - but if you cannot find anything amiss, contact your IT staff to resolve the problem.
- After the test e-mail arrives, click OK. This will save the settings and return to the previous window.
The Web Service API is the main programming interface of memoQ server. It allows external programs to manage projects, documents, and resources in an automated way. On the Web Service API tab, you can enable or disable it, set a base address, and secure the connection.
The WS API is licensed separately. memoQ server will not offer this interface if you have no specific license for it.
It is extremely dangerous to expose the WS API without protection. Although the API is not so easy to figure out, a thorough attacker can gain full control of the server in time.
You have three options to secure the WS API:
- Encryption – you can force callers to use a HTTPS connection, with the same certificate you used to secure the Resources API.
- Shared secret or API key – you can force callers to authenticate using a so-called API key. The API key is the same for every caller, which means you need to protect it well: the more callers know the secret key, the less protected the API is.
- IP address filtering – Normally, the caller of the WS API will be a server application, running on a computer that has a fixed IP address. You can make sure that no-one can reach the WS API from any other IP address. In addition, if there are numerous callers, but they all belong to a corporate network, you can filter for the addresses of that network, excluding everyone else.
To check or configure the settings of the WS API, click the Web Service API tab.
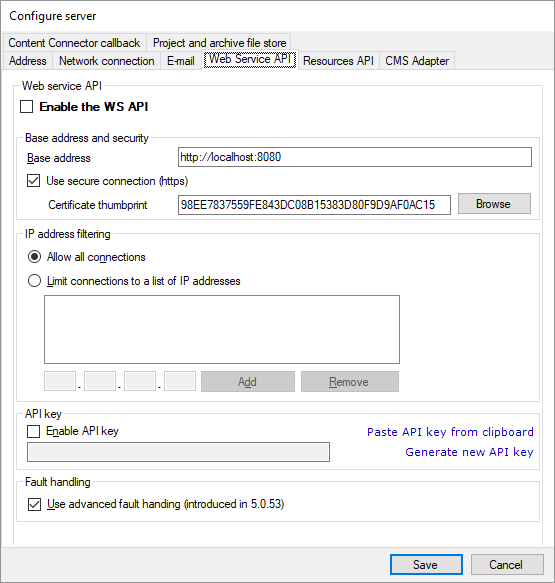
Do not enable the WS API if you are not using it. If you plan to use it later, keep the Enable the WS API check box cleared until there actually is at least one caller application in your organization. Check the check box only if the API needs to be called immediately after that.
In the Base address and security box, enter the address and port where the API will listen. The default port is 8080, but you can use any free port. (Do not change it unless the settings of your network require it.) Make sure that the firewall rules allow the callers to connect to memoQ server over this port. For the base address, enter the external address of the server (if the caller application is not on the same computer).
To turn on encryption, check the Use secure connection (https) check box. Click Browse. A Windows Security window opens. Choose a certificate, then click OK. You must choose from existing certificates; you cannot generate or install a new certificate here.
To acquire or install a new certificate: Go to the Resources API tab, configure the secure connection there, and then return to the Web Service API tab.
For additional security, you can also set up IP address filtering and a secret API key. This means that you can choose which computers can access memoQ server using the API. This may be important because the Web Service API can be exploited to attack the memoQ server.
To secure the connection using a secret key, check the Enable API key check box. This is a sort of password that callers must send before they can call on the WS API. You can either paste a key from the clipboard, or generate a new one here. It is recommended to generate a key here. To do that, click Generate new API key. That will give you a key that is complex enough and cannot be guessed easily.
Always use encryption (https) when you use an API key. If the connection is not encrypted, an eavesdropping attacker could easily extract it from the network traffic, and then impersonate a legitimate caller.

These are only the security options that memoQ server offers out of the box. You can further strengthen security using industry-standard methods such as setting up a virtual private network (VPN) or IPSec connection to the memoQ server – then you can introduce proper authentication where the caller must impersonate a legitimate user of your network, and thus be identified more precisely.
Do not clear the Use advanced fault handling check box unless you need to use an application that was written for a memoQ server of version 5.0.52 or earlier. This fault handling mode is crucial so that external programs can receive detailed error and status messages from the API.
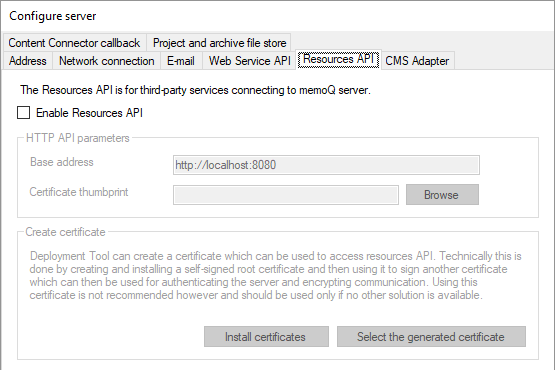
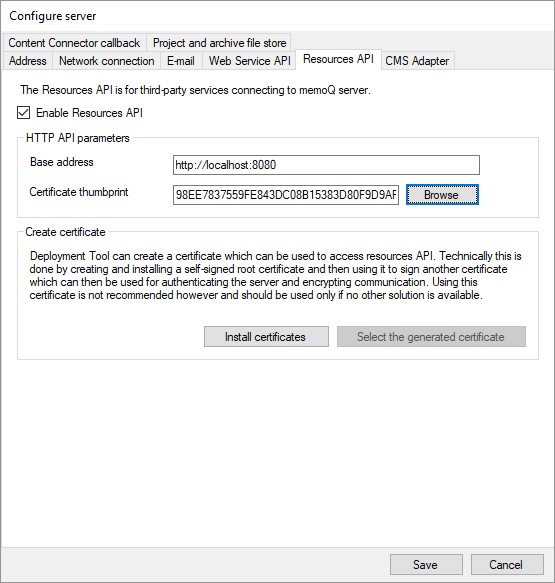
The Resources API is an interface that third-party tools - such as SDL Trados Studio - can use to access, query, and update translation memories or term bases. To enable and configure this API, click the Resources API tab.
Secure the entire memoQ server from here: This is where you can acquire and install certificates for memoQ server. You need to come here first even when you need to secure general access to memoQ server or to the Web services API.
Do not enable the Resources API if you are not using it. If you plan to use it later, keep the Enable the Resources API check box cleared until there actually is at least one caller application in your organization. Check the check box only if the API needs to be called immediately after that. If you use this tab to acquire and install a certificate, you can clear the Enable Resources API check box again after you install the certificate.
In the Base address and security box, enter the address and port where the API will listen. The default port is 8080, but you can use any free port. (Do not change it unless the settings of your network require it.) Make sure that the firewall rules allow the callers to connect to memoQ server over this port. For the base address, enter the external address of the server (if the caller application is not on the same computer).
The Resources API always uses an encrypted connection. You need to create and use a certificate for that purpose. To choose a certificate: Next to the Certificate thumbprint box, click Browse. A Windows security window opens. Choose a certificate, then click OK. You can choose from installed certificates only.
To create or install a certificate, do the following:
- Check the Enable Resources API check box.
- Click Install certificates. The Deployment tool will create and install two certificates: a self-signed root certificate to sign the server certificate, and the server certificate itself. While this is happening, command-line windows may briefly appear on the screen.
- Once the certificates are created, you need to insert the thumbprint (a long numeric identifier) of the server certificate in the Certificate thumbprint box in the same window. To do this, click Select the generated certificate.
- The thumbprint appears in the Certificate thumbprint box:
Reinstalling? Use the existing certificate, don't create a new one: On a computer, you only need to create the certificate once. If you reinstall memoQ server, you will not be able to create the certificate again. However, in this case, you can click Browse next to the Certificate thumbprint box, and choose the existing certificate from a menu.
If you are using a self-signed certificate, you may need to install the root certificate on all client computers. To retrieve this certificate, use the Certificates console in Windows, and save the certificate in a file. Transfer this file to the client computers, and use the Certificates console to install the root certificate there.
Use the same certificate everywhere: Once you create the certificate and enable the Resources API, you can use the same certificate to turn on secure connections for other protocols on memoQ server. To secure memoQ server access in general, click the Network connection tab. To secure access to the Web service API, click the Web Service API tab.
Turn off the Resources API again if you came to this tab just to install a certificate - but you do not actually need the Resources API.
If you turn this on, memoQ server will listen to third-party services that inject translatable content into new online projects.
You need to turn it on the same way as you turn on the Resources API.
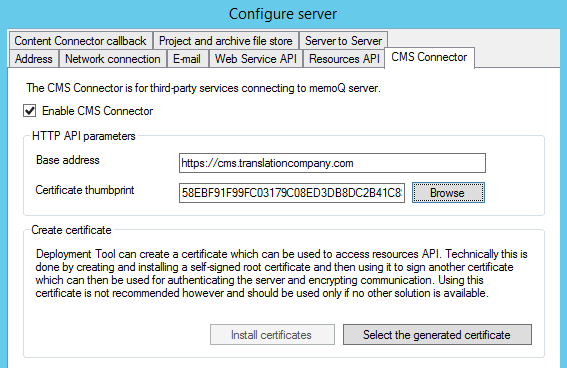
To configure the CMS Connector, click the CMS Connector tab in the Configure server window:
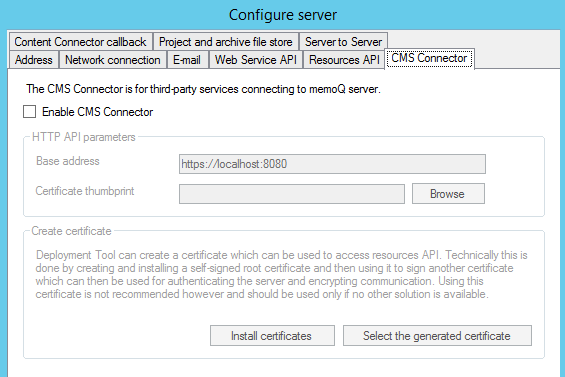
Do not enable the CMS Connector if you are not using it. If you plan to use it later, keep the Enable the CMS Connector check box cleared until there actually is at least one caller system in your organization. Check the check box only if the CMS Connector needs to receive content immediately after that.
In the Base address box, enter the address and port where the CMS Connector will listen. The default port is 8080, but you can use any free port. (Do not change it unless the settings of your network require it.) Make sure that the firewall rules allow the callers to connect to memoQ server over this port. For the base address, always enter the external address of the server. Even if WordPress and memoQ Server runs on the same machine, they communicate over WPML Translation Proxy, which is on the Internet.
The CMS Connector always uses an encrypted connection. You need to create and use a certificate for that purpose. To choose a certificate: Next to the Certificate thumbprint box, click Browse. A Windows security window opens. Choose a certificate, then click OK. You can choose from installed certificates only.
To create or install a certificate, do the following:
- Check the Enable CMS Connector check box.
- Click Install certificates. The Deployment tool will create and install two certificates: a self-signed root certificate to sign the server certificate, and the server certificate itself. While this is happening, command-line windows may briefly appear on the screen.
- Once the certificates are created, you need to insert the thumbprint (a long numeric identifier) of the server certificate in the Certificate thumbprint box in the same window. To do this, click Select the generated certificate.
- The thumbprint appears in the Certificate thumbprint box:
Reinstalling? Use the existing certificate, don't create a new one: On a computer, you only need to create the certificate once. If you reinstall memoQ server, you will not be able to create the certificate again. However, in this case, you can click Browse next to the Certificate thumbprint box, and choose the existing certificate from a menu.
If you are using a self-signed certificate, you may need to install the root certificate on all client computers. To retrieve this certificate, use the Certificates console in Windows, and save the certificate in a file. Transfer this file to the client computers, and use the Certificates console to install the root certificate there.
Use the same certificate everywhere: Once you create the certificate and enable the CMS Connector, you can use the same certificate to turn on secure connections for other protocols on memoQ server. To secure memoQ server access in general, click the Network connection tab.
Turn off the CMS Connector again if you came to this tab just to install a certificate - but you do not actually need the CMS Connector.
The Content Connector is an external module that allows memoQ server to pick up new and changed documents from certain folders or other content sources. Through a content connector, a translation project can automatically get new source documents: in such projects, the project manager does not have to import those documents manually.
The Content Connector has an operating mode called the push notification. When this works, the content connector calls on memoQ server to indicate there is new content in the content source, and that memoQ server should ask for it.
For security reasons, memoQ server does not allow this by default. Before you use push notification from content sources, you need to enable the content connector callback. To do so, click the Content Connector callback tab.
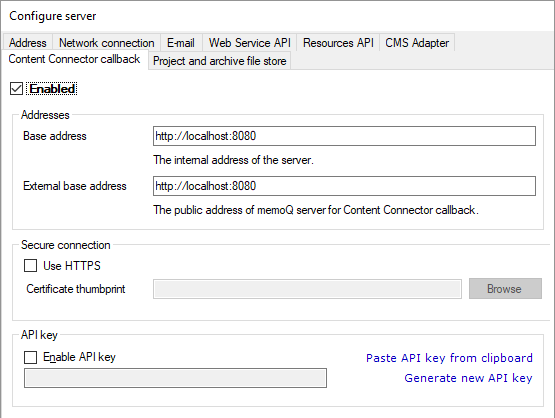
To allow calls from the Content Connector, check the Enabled check box. Review the server addresses. If the content source is on a different machine, enter the web address for that machine in the External base address box. The external address should be publicly accessible from the internet (the localhost setting in the example will not work in this case).
You can still use the Content Connector from memoQ server even if you do not allow calls from it. If the content source cannot call in, memoQ server must use the pull notification. In this operating mode, memoQ server needs to check for changes in the content source regularly, every few hours.
If the Content Connector and memoQ server are not on the same computer, or the same computer hosts several other memoQ servers or services for various organizations, you need to secure the connection between the Content Connector and memoQ server.
To secure the connection between the content connector and memoQ server, check the Use HTTPS check box. To choose a certificate, click Browse next to the Certificate thumbprint box.
To install or even create a (self-signed) certificate, use the Resources API or the CMS Connector tab.
If you are using a self-signed certificate, you must install the certificate on the computer that runs the Content Connector.
For additional security, you can also set up a secret API key. This means that you can ask the content connector to identify itself before it is allowed to send a push notification.
Do not use API key if you are not using HTTPS: If the connection is not encrypted, the API key will not make it safer. On the contrary: you will expose the secret API key over an unsecured connection.
To secure the connection using a secret key, check the Enable API key check box. This is a sort of password that the Content connector must send before they can call on the memoQ server. You can either paste a key from the clipboard, or generate a new one here. It is recommended to generate a key here. To do that, click Generate new API key. That will give you a key that is complex enough and cannot be guessed easily.
On memoQ server, exporting documents from an online project can be fully automatic. When the project is created from a template, it can have an automated action to export the finished translation.
In addition, memoQ server can archive projects one by one, into memoQ project archive (.mqarch) files. Normally, memoQ server will save these archive files on the server itself, and they can be restored from there – or copied to another location.
To be able to export files and archive projects, memoQ server needs a location where it can save the documents and the project archives. This is a folder – or two folders – on the memoQ server computer. In extreme cases, you can also use another computer for that.
Normally, this folder is on the memoQ server computer, in the C:\ProgramData\memoQ server project file storage folder. (You can share this folder with other computers in your network, or you can make it available through an FTP server – but you can also store the documents elsewhere, even on another folder.)
To access the files that memoQ server exports, use memoQ. Open the online project in the memoQ online project window, and use the Files pane to view and download the exported files.
To change this folder, open the Configure server window, and click the Project and archive file store tab.
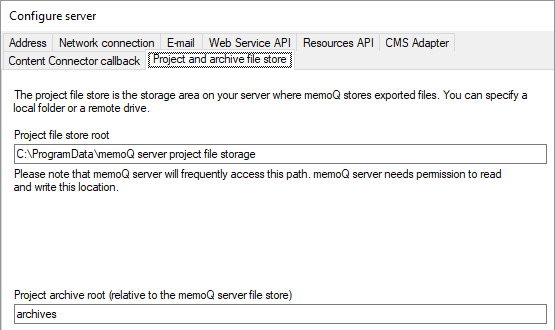
Normally, you do not need to change the paths. However, if you need to store the files elsewhere, and you have set up the new folder: In the Project file store root box, enter the path of that folder. If the new folder is on another computer, you need to use this form: \\server-name\shared-folder\path.
Make sure that the memoQ server service account (by default, the user called MemoQ Server service) has Full control or at least Modify permission over the folder. If you are using the default folder, this will be set up automatically. However, if the folder is on another computer, it is best if memoQ server runs in the name of a domain user, and that domain user is granted access to the folder. You can change this user from the Deployment tool: in the memoQ server section, click Advanced, and choose Change service user.
If you change the file store folder, memoQ will not move existing data to the new location. Previously exported documents will remain in the old folder. However, from this point on, all documents will be exported to the new location.
Do not change the project file store path unless you need to have it on a different computer or a different disk.
In the project file folder, memoQ server will create a separate folder for each project. The name of the folder is the same as the name of the project.
Normally, the project archive files will be saved in the same folder. However, you can choose an additional folder inside the project file store root folder. For example, type the word Archive in the Project archive root box. memoQ server will create the C:\ProgramData\memoQ server project file store\Archive folder, and save the project archives there.
For security reasons, when memoQ servers are talking to each other, they need to authenticate themselves. This requires certificates. To install and configure these certificates, open the Configure server window, and click the Server to server tab.
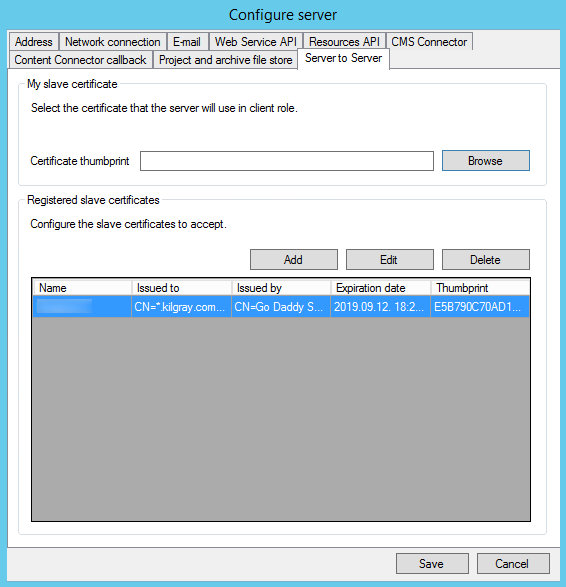
To choose the certificate this server will use when it is a child server:
- Under My slave certificate, click Browse.
- In the Windows Security window, choose a certificate and click OK.
- The certificate's thumbprint appears in the Certificate thumbprint field.
- At the bottom, click Save.
To add a child server's certificate when this memoQ server is a parent server:
- Under Registered slave certificates, click Add.
- In the Edit slave certificate window, click Browse.
- In the Browse certificate files window, find the child server's certificate, and click Open.
- Type a name for the certificate in the Name field, and click OK.
- At the bottom, click Save.
To edit a child server's certificate when this memoQ server is a parent server:
- Under Registered slave certificates, click Add.
- In the Edit slave certificate window, make the changes you want.
- At the bottom, click Save.
To remove a child server's certificate when this memoQ server is a parent server:
- Under Registered slave certificates, select the certificate you want to remove.
- Click Remove.
- At the bottom, click Save.
Changes are not immediate: After you click Save, you need to restart memoQ server.
When you finish
To save the new settings, and return to the Deployment tool: Click Save.
To just return to the Deployment tool, without saving the changes: Click Cancel.
You may need to stop and restart the memoQ server service. To learn how, see the Start or stop memoQ server topic.